|
Doe maar Gek,dan doe je al Gewoon Genoeg Soyez fou, c’est déjà assez Normale |


|
Legends quest 2 |
|
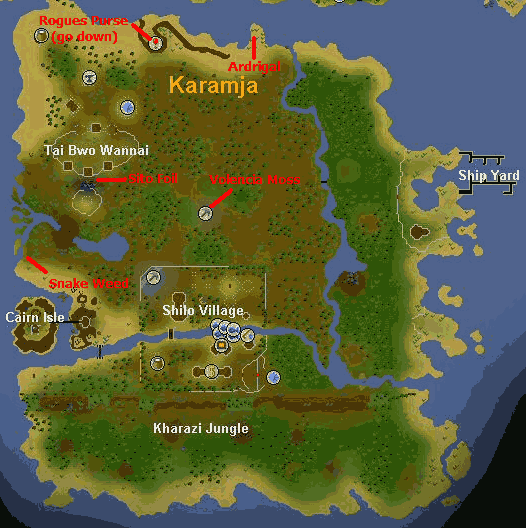
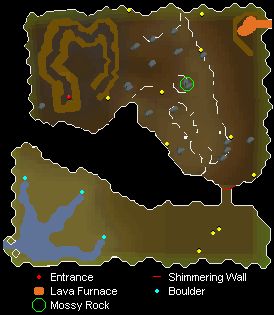
1. Gujuo will tell you that you need to go to the Holy Water source to see what happened, and for that you need to make a Bravery potion which will make you brave enough to enter the deep cave section. For that potion you will need 2 herbs which are: Snake Weed and Ardrigal. [Roughly, the Snake Weed is southwest of Tai Bwo village; search the vines near the water. Search palm trees on beach northeast of Tai Bwo village for Ardrigal. The picture below has been borrowed from the RS2 Jungle Potion quest guide.] 2. Make the Bravery Potion by using Snake Weed on a Vial of water and then using Ardrigal on it. The potion will look like murky water. The next steps require the Bravery potion, Rope, Lockpick, pickaxe, Unpowered orb, and the Charge orb runes, in addition to the minimum Kharazi equipment of hatchet, Machete and map. Wield your best armor and weapon, as you will have to fight several high-level enemies. Holy water vials or Silverlight are optional when fighting the demon, but if you plan to go for the Holy Force spell (Step 29), you can postpone bringing these since you will have time for another bank run after you speak to Ungadulu (though this will cost you a second Casting of Charge Orb). Prayer potions and food are recommended. Expect to take damage from agility obstacles. 3. Make your way back to the gems spot where you got the Book of Binding. Go to the Ancient Gate on the north wall and cast a Charge Orb spell - it does not matter which one you use. Note that you must re-cast this spell each time you wish to pass this gate, so always remember to pack the necessary runes and an Unpowered orb. 4. Now you will see a winch. Use your rope on it BUT before going down, drink your Bravery potion. Your rope will remain in place for all future uses of this winch; just search to reveal it. If you forgot your rope, you can smash the barrels until you find one, but they may also release damaging explosions and various enemies (bat, hobgoblin, spider, etc.) The Bravery potion is only needed the first time. 5. This is the second level of the dungeon. 6. Climb down the rock that looks like stairs. This narrow cliff path is a gauntlet of rockslide agility obstacles which may inflict damage. Wandering the cavern below are the spirits of three long dead warriors: San Tojalon (level 106), Irvig Senay (level 100), and Ranalph Devere (level 92). Kill one of each to get 3 different pieces of crystal. Now go the northeast corner and use your crystal parts together on the lava furnace to make a heart-shaped crystal. 7. At the center of the cavern (on the radar map it looks like the dragon's "eye"), find a mossy rock that you can 'Search'. Search it, then use your crystal on it and the crystal will start to glow. 8. Now use your crystal on a symbol in the wall in the southeast corner of the cavern. The crystal will fit perfectly and you will be able to pass through the Shimmering Wall. 9. Now run West past the three Lesser Demons (level 82) and try to push a boulder at the water's edge. A ghost will appear and ask you to help him by killing Viyeldi. The ghost will give you a black dagger, so equip it. At this point you have two options. (1) Go back where the blue hat was and attack Viyeldi. The dagger will begin to glow so go back to the ghost and prepare to fight. Drink potions now and use the dagger on the ghost. If the ghost just disappears, push the rock it will appear again. Now you will have to kill the demon again, but this time he reduces all your prayer, so use Prayer potion(s). (2) **If you are going for the Holy Force spell, pass Viyeldi and head back up to Ungadulu and show him the dagger (Use it on him). He will give you a Holy Force Spell which will help you when you fight the second demon. While up here, you might as well bank for more food, another orb and the runes for the Cast Orb spell to re-open the third Ancient Gate; you don't need another rope, and you won't have to fight the warriors again. Holy water vials and Silverlight are optional for fighting the demon. After your bank trip, go all the way back to the springs at the end of the second level of the dungeon, push the boulder, and use the Holy Force Spell on the spirit. It will transform into the demon who must be defeated a second time (Silverlight and Protect from Melee are recommended). This way you would not have to kill Viyeldi, the demon will be weaker, and you will not have to fight the 3 warriors again when you get to the final demon battle below.** 10. Now push a boulder. It will require a couple of pushes from different angles to move it as far as possible. After you move it, use your bowl on the Holy Water spot. Use your Holy Water on Yommie Tree Seeds to germinate them and fill your bowl with Holy Water again. Now get back to the surface. [If you do not have your blessed bowl with you, you can refill it later on the surface since your movement of the boulder will refresh the Water Pool.] 11. This step requires your rune hatchet, the Yommie Tree seeds and a Blessed bowl full of Holy Water (in addition to the normal Kharazi equipment). Bull Roar Gujuo and tell him you have germinated the Yommie Tree Seeds and he will tell you that you need to find fertile soil. Search for fertile soil (dark brown spots on the ground) and use a seed on it. A tree will grow - when it becomes a young tree and needs water, use Holy Water on it and the tree will become an adult. Now do this fast: use your Rune axe (hatchet) on it a few times until you get a Totem Pole; do it fast or the tree will die. Raise your totem pole and pick it up. It is so heavy that you may lose some strength. 12. This step is the final battle, so in addition to having your Totem Pole, be prepared with your best armor and weapon (optionally Silverlight for the demon), optional Holy water vials, Super Set of potions, prayer potions, and/or high-level food. Search for a Dark Totem Pole [there is one east-northeast of the water pool, but they are scattered throughout the jungle]. Before doing anything, drink your Super Set potions and then use your Totem Pole on the Dark one. The demon will appear and you will again have to fight the 3 warriors from the cave - the levels 106, 100 and 92. **If you went for the Holy Force spell in step 29, you would not have to kill the 3 warriors, just straight to the demon.** Again, the demon will drain your prayer right away, so save your Prayer potions until that happens. Protect against Magic Melee is recommended for this battle. Then, after vanquishing the demon for the final time, use your Totem Pole on the Dark totem pole again. Bull Roar Gujuo for the last time he will give you a Gold Totem Pole and some words of friendliness. Bring that Totem Pole back to Erkle at his Guild office and give it to him along with the complete Radimus Map. Now meet him in the Legends Guild lobby and talk to him again; you will be able to choose 4 skills to gain exp. in, and after that you will have completed the Legends Quest!
|